

In acest tutorial video, va vom arata cum puteti sa va optimizati sistemul fotovoltaic pentru a obtine o productie maxima chiar si pe timp de ceata sau innorat. Veti vedea cum am reglat parametrii sistemului, cum am setat boilerul pentru a reduce consumul si cum am obtinut o productie maxima chiar si in conditii nefavorabile. Acest tutorial este perfect pentru cei care doresc sa isi maximizeze productia de energie solara si sa reduca costurile asociate.
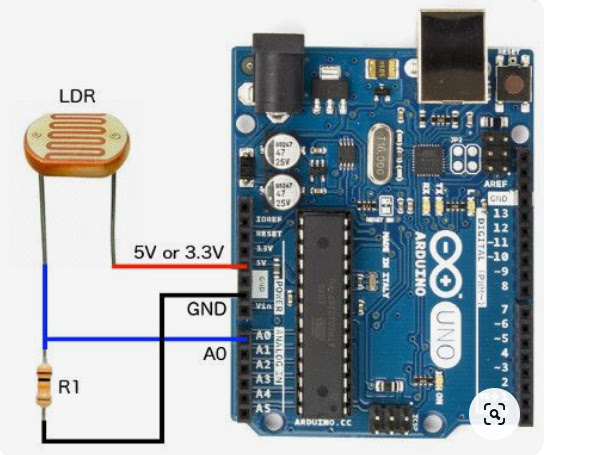
Un montaj cu Arduino care utilizează un senzor LDR (Light Dependent Resistor) poate fi utilizat pentru a detecta nivelul de lumina ambientala si a lua decizii in consecinta. In acest montaj, Arduino este conectat la senzorul LDR prin intermediul unui circuit de rezistori. Arduino citeste semnalul primit de la LDR si il foloseste pentru a determina nivelul de lumina. In functie de nivelul de lumina detectat, Arduino poate declansa diferite actiuni, cum ar fi aprinderea sau stingerea unei leduri sau controlul unui motor.
Adaptat la un dimmer de 4kw ca in video.
Arduino code:
#
// Set the LCD address to 0x27 for a 16 chars and 2 line display
//LCD settings
const uint8_t I2C_ADDRESS =0x3f;//watch video. use I2C Scanenr to get the address
const uint8_t LCD_CHAR= 16;
const uint8_t LCD_LINE = 2;
char *TITLE_ANGLE1 ="Angle: ";
LiquidCrystal_I2C lcd(I2C_ADDRESS, LCD_CHAR, LCD_LINE);
unsigned int LCD_VCC=13;//5V pin for LCD
// start of servo1 settings *******
Servo myservo1; // create servo 1 object to control a servo
int pot1pin = A0; // analog pin used to connect the potentiometer
int pot1VccPin = 12;//pin 12 used as 5V for potentiometer
unsigned int servo1Pin=3;//any pin with ~ which means pin is PWM enabled
unsigned int servo1AngleMin=0;//servo1 minimum angle
unsigned int servo1AngleMax=180;//servo1 maximum angle details
//// do not change the lines below
unsigned int servo1Val=0;// variable to read the value from the analog pin
unsigned int angle1=0;
// END of servo1 settings *******
void setup()
{
Serial.begin(9600);
Serial.println("Servo with Potentiometer");
Serial.println("SERVO");
myservo1.attach(servo1Pin); // attaches the servo 1 to the servo object
digitalWrite(pot1VccPin,HIGH);//5V for Potentiometer (variable resistor)
// initialize the LCD
pinMode(LCD_VCC, OUTPUT);
digitalWrite(LCD_VCC,HIGH);//5V for LCD
lcd.print(" Servo");
lcd.setCursor(0,1);
lcd.print("Angle: ");
delay(2000);
}
void loop()
{
servo1Val = analogRead(pot1pin); // reads the value of the potentiometer (value between 0 and 1023)
sendServo(servo1Val);//send sevo zero
delay(20);
}// loop end
/*
* sendServo(int value)
* @brief sends the servo the "avlue" angle position
* @param "value" integer between 0 to 180
* @return none
* Written by Ahmad Shamshiri for robojax.com
* on Nov 22, 2020 in Ajax, Ontario, Canada
*/
void sendServo(int value)
{
unsigned int newAngle1;
newAngle1 = map(value, 0, 1023, servo1AngleMin, servo1AngleMax); // scale it to use it with the servo (value between servoAngleMin and servoAngleMax)
if(angle1 !=newAngle1)
{
myservo1.write(newAngle1);
lcdDisplay(newAngle1);
angle1 =newAngle1;
delay(100);
}
}//sendServo()
/*
* lcdDisplay(int angle)
* @brief dispalys the "angle" angle position
* @param "angle" integer between 0 to 180
* @return none
* Written by Ahmad Shamshiri for robojax.com
* on Nov 22, 2020 in Ajax, Ontario, Canada
*/
void lcdDisplay(int angle)
{
clearCharacters();
Serial.print("angle");
Serial.println(angle);
lcd.setCursor((unsigned)strlen(TITLE_ANGLE1), 1);
lcd.print(angle);//print value of angle
lcd.print((char)223);
} //
/*
clearCharacters()
* @brief clears a line of display (erases all characters)
void clearCharacters()
{
for (int i=(unsigned)strlen(TITLE_ANGLE1)-1; i<=LCD_CHAR-1; i++)
{
lcd.setCursor (i,1); //
lcd.write(254);
}
}//clearCharacters
0 Comments